Position Matters More Than You Think
How you lie while tanning directly affects how even your tan turns out. Most people just flop down on their back, scroll their phone for an hour, and then wonder why their front is way darker than their sides. Your body has curves, angles, and shadowed areas that need intentional positioning to tan evenly.
Think of it like rotating a chicken on a rotisserie. Every side needs equal heat. Weird comparison? Maybe. Accurate? Absolutely.
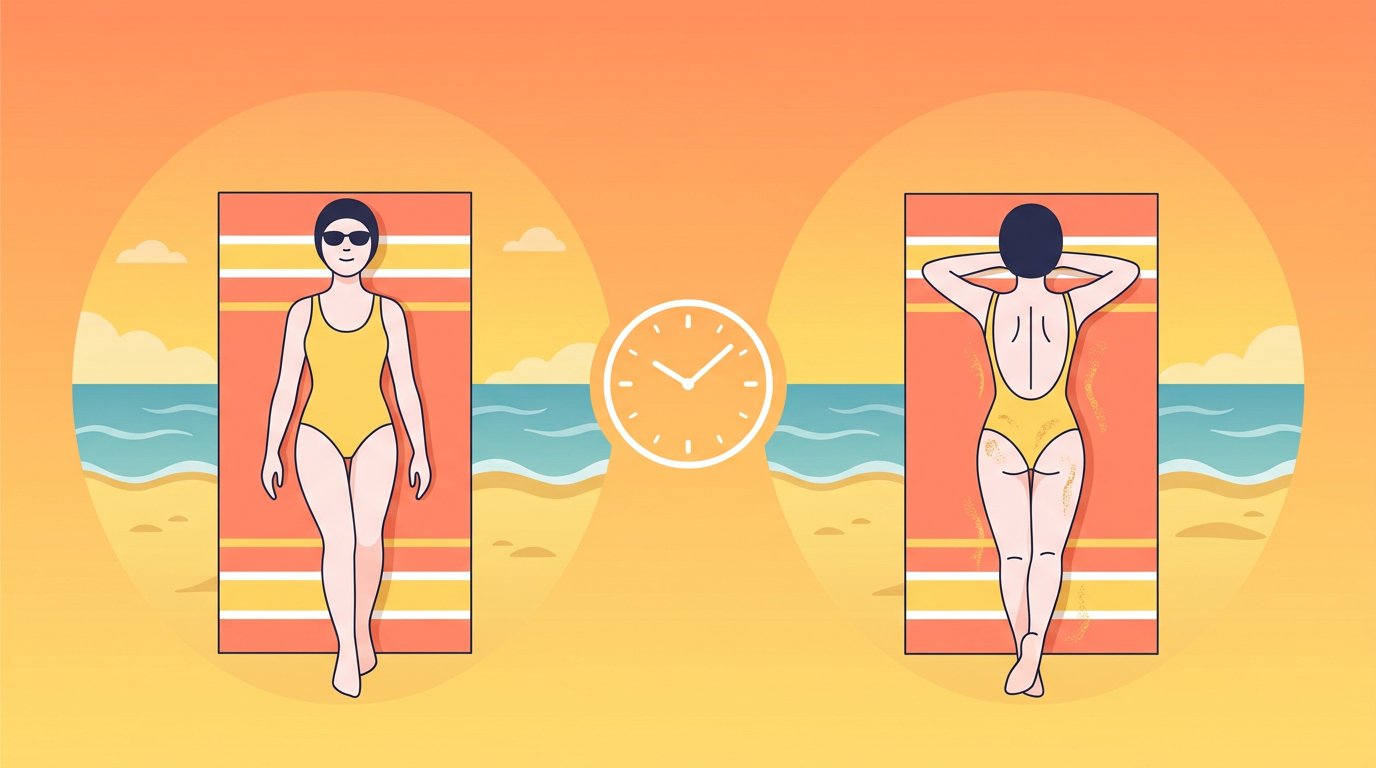
The Classic: Lying Flat (Face Up)
This is everyone's default and it's fine — for part of your session. Lying flat on your back exposes your chest, stomach, thighs, and face to direct overhead sun.
Tips for face-up: Arms slightly away from your body (not pressed against your sides). Palms up to tan the insides of your wrists and forearms. Legs slightly apart so inner thighs get some exposure. Chin slightly up to tan your neck evenly.
Time: 15-20 minutes.
Face Down
Your back, hamstrings, and calves need love too. Face-down tanning is less comfortable but essential for an even tan.
Tips for face-down: Turn your head to alternate sides every 5 minutes to avoid a line on your neck. Arms alongside your body, palms up, to tan the back of your arms. Point your toes to flatten your calves and get more even coverage. Use a thin pillow under your hips to flatten the lower back curve.
Time: 15-20 minutes.
Side Tanning (The Forgotten Move)
This is the position most people skip, and it's exactly why most people have pale sides. Your flanks, outer thighs, and the sides of your arms barely get any sun when you're lying flat.
Right side: Lie on your left side with your right arm resting on your body or behind your head. Top leg slightly forward for stability. This exposes your entire right flank, outer thigh, and right arm.
Left side: Mirror the position on the other side.
Tips for side tanning: Use a propped elbow for stability and comfort. Scroll your phone during side time — it's easy to hold up. Keep your top leg slightly forward so you don't roll.
Time: 10 minutes per side.
The Full Rotation Schedule
Here's the ideal rotation for a 60-minute session:
15 minutes face up. 15 minutes face down. 10 minutes on right side. 10 minutes on left side. 10 minutes face up again (to finish and even out).
Set phone timers for each switch. This rotation hits every surface of your body with roughly equal UV exposure. It's the closest you'll get to an even, all-over tan without a tanning bed.
Elevated Legs
If your legs tan slower than your upper body (super common), try elevating them. Stack a rolled towel or pillow under your ankles while lying face up. This angles your shins and thighs slightly more toward the sun, increasing UV exposure on your legs.
Bonus: it's also more comfortable and reduces swelling if you've been standing all day. Just make sure you don't create a shadow on your stomach from the elevated legs.
Standing
Standing while tanning sounds weird but it's actually great for even coverage — especially for your sides and areas that get shadowed when lying down.
Stand facing the sun for a few minutes, then turn 90 degrees every 3-5 minutes to hit all sides. This is perfect for a quick 10-15 minute maintenance session when you don't want to set up a whole lying-down situation. Great for the backyard when you're grilling, gardening, or just hanging out.
Pool Float Tanning
Floating on a raft is elite tanning for a few reasons: you're getting direct sun from above PLUS reflected UV from the water surface. You're elevated, which reduces ground-shadow issues. And the gentle floating movement naturally shifts your angle to the sun.
Tips for float tanning: Choose a flat raft, not one with raised sides that cast shadows. Flip over carefully halfway through (or use a raft you can lie face-down on). Anchor your float so you don't drift into shade. Reapply waterproof SPF — water reflection means more UV intensity. Bring a waterproof phone case for your timer and music.
Positions to Avoid
Sitting hunched over your phone. Creates shadows on your stomach, undertans your back, and gives you a weird neck tan. If you must look at your phone, hold it up and keep your posture straight. Fetal position/curled up. Maximum unevenness. Your inner surfaces get zero sun while your outer surfaces over-tan. One position for the entire session. This is how you get a tan on your front and nothing on your back. Rotation is everything.
The difference between a patchy tan and a gorgeous, even tan is often just positioning. Set your timers, do your rotations, and your tan will look like you just got back from vacation.
Learn more: How Long to Tan Each Side | Tanning Outside Tips
Adapting Positions to Sun Angle
Midday (11 AM-1 PM): Sun nearly overhead. Lying flat gives the most even exposure. Side tanning less critical.
Morning (9-11 AM): Sun at an angle from the east. One side gets more UV. Prioritize side-lying during morning sessions.
Afternoon (2-5 PM): Same principle, from the west. If one arm is always darker, it may be because you tan at the same time without adjusting orientation.
The TanAI app tracks real-time UV and sun position. The tanning calculator adjusts session length based on current UV.
Positions for Specific Problem Areas
Pale stomach: Lie on your back with torso slightly elevated. Relax abs completely — tensed muscles create tiny shadows. See our stomach tanning guide.
Inner thighs: Frog-leg position — knees bent outward, soles together. Fully exposes inner thighs.
Under chin and neck: Tilt head back slightly when face-up.
Back of legs: When face-down, bend knees and bring feet up toward the sky. Alternate bent and straight.
The Activity-Based Approach
Gentle movement helps even things out. Reading while propped on elbows exposes your entire front with face tilted down. Standing activities like gardening or walking expose all sides as you naturally move and turn — one of the best ways to get even coverage.
Take our skin type quiz to know your limits, then use these positions strategically.
The Chair Positions (Underrated)
Not everyone has to lie on the ground to tan. Chair-based positions have some real advantages that flat-on-the-ground tanning does not offer:
Low-angle beach chair: This is arguably the best single position for overall tanning. At a 15-30 degree angle, your entire front — face, chest, stomach, tops of legs — faces the sun more directly than lying flat, especially during morning and afternoon when the sun is at an angle. Your stomach, which normally gets the least UV when lying flat, gets significantly more exposure in a reclined chair because it is angled toward the sun instead of parallel to it.
Sitting upright in a folding chair: Great for tanning your legs, front of thighs, and shins. Extend your legs straight out in front of you, feet elevated slightly on a cooler or rolled towel. Your legs face the sun directly and get even, consistent exposure. This position is also the best for dedicated foot tanning — tops of feet face the sky perfectly.
Dining chair sideways: Sit sideways in a regular chair with your legs extended to one side. This exposes the side of your body that usually gets ignored. After 10-15 minutes, switch to the other side. It is not the most comfortable position, but it is one of the few that consistently hits your flanks and the sides of your torso.
The beauty of chair-based tanning is that you can read, study, eat, or use your phone without the awkwardness of doing those things face-down on the ground. You stay awake, you stay engaged, and you are less likely to fall asleep and overcook one side — which means a more even, safer tan overall.
Timer Apps and Position Tracking
The TanAI app tracks your tanning sessions and can remind you when to flip and change positions. If you do not use the app, here are simple timer setups that work with your phone's built-in clock app:
For a 60-minute session: Set 5 alarms: 0 min (start face-up), 15 min (flip to face-down), 30 min (turn to right side), 40 min (turn to left side), 50 min (back to face-up for final 10), 60 min (session done). Label each alarm with the position name so you do not have to remember the sequence.
For a 40-minute session: Set 4 alarms: 0 min (face-up), 10 min (face-down), 20 min (right side), 30 min (left side), 40 min (done). Shorter per-position times but the same four-position rotation ensures even coverage.
The most common reason for uneven tans is inconsistent positioning — spending 25 minutes face-up and only 5 minutes face-down because you forgot to flip. Timers eliminate this entirely. Set them once and your rotation is automatic for every future session.
Quick Reference: The Perfect 60-Minute Session
Here is your go-to rotation printed on an index card or saved as a phone note so you never have to think about it again:
0:00-0:15 — Face up (back on ground). Arms slightly away from body, palms up. Legs slightly apart. Chin slightly up for neck exposure.
0:15-0:30 — Face down (front on ground). Head turned to side, arms alongside body. Thin pillow under hips to flatten lower back curve.
0:30-0:40 — Right side. Right arm behind head or resting on body. Top leg slightly forward for stability. Scroll phone if needed — this position is easy for screen use.
0:40-0:50 — Left side. Mirror the right side position. Same comfortable, stable setup. Keep your flip timer running.
0:50-1:00 — Face up again for the finish. This final 10 minutes evens out anything you missed and gives your front a finishing touch.
Set 5 timers on your phone labeled with each position change. After doing this rotation 3-4 times, it becomes automatic. Your body knows the sequence, you flip without thinking, and your tan comes out beautifully even every single time. This is the rotation that professional tanning coaches recommend, and it works because it gives every surface of your body proportional exposure.